
In schools across the country, around this time of year, children are becoming industrious with compost, and seeds and are watering everything in sight. Classrooms are filled with anticipation and frustration in equal measure as children wait impatiently for ‘something’ to happen. After several days, usually a weekend, things start to happen. Green sprouting stems and infantile leaves begin to appear. The young seedlings seem to have a life of their own (which they do) as they appear to face different directions each time the children remember to observe them.
This is exactly the feeling of my youngest when he proudly came home with a tiny green sprout, that he proudly exclaimed was a sunflower. We placed it on the windowsill and dutifully watered and cared for it. Heaven forbid it should shrivel and perish on our watch! Each time we came back to it, the sunflower had changed which direction it was facing. My son became quite excited and announced we should video the sunflower so we could see it move. This was where our Raspberry Pi time-lapse adventure began.
Physically setting up the Raspberry Pi and the camera module was quite straightforward. There is a fantastic project on the Raspberry Pi website called Getting Started with the Camera Module, which walks you through everything you need to get started.
To enhance your time-lapse video creation, start by acquiring a camera module available online for an affordable price of around £26. Once you have the module, follow the provided detailed step-by-step instructions to ensure a smooth setup process. Keep in mind that the camera module may not be initially compatible with the latest Raspberry Pi operating system, Bullseye. However, the instructions will guide you on how to address this compatibility issue. For optimal results, I recommend using the previous operating system, Buster, as it has proven to work better when capturing repeat images, crucial for creating a seamless time-lapse video. So, dive into the project with confidence and enjoy the process of capturing captivating moments.
For creating the code to take the photographs, I followed a great tutorial by Gus at PiMyLifeUp.com. Once the camera was set up and I had taken several random photographs of my kitchen ceiling, I was ready to go. To save time, I downloaded the source code directly from the website to my Raspberry Pi. I first created a bash script, which would take the photograph and date and time stamp it. I then used Crontab to schedule when the photographs would be taken. I used Crontab Guru to create the expression to take a photograph every 15 minutes.
As previously mentioned, I found this stage quite frustrating when attempting in Bullseye OS. I could take individual pictures, but the Crontab schedule would not work. After several false starts, this problem was resolved when I changed to the Buster legacy OS.
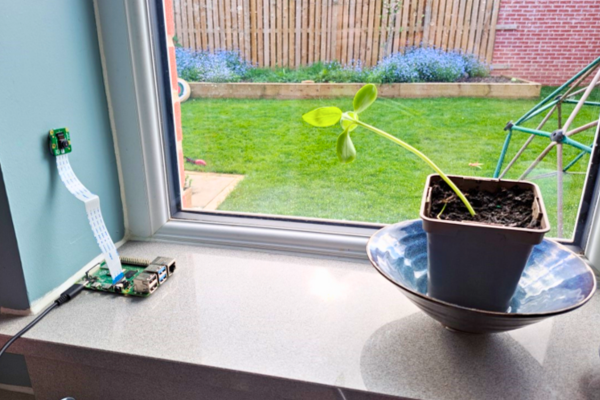
When positioning the camera, I simply used Blu-Tack to stick the module to the wall of the windowsill. More elaborate solutions were available, but this seemed to be the simplest. One thing that I didn’t check was what was in the background when the photographs were taken. If I did this again, I would position the camera closer to the plant, so that any changes can be more easily seen and there is less of my kitchen in the frame!
After checking that everything was OK, we ran the script for 6 days. This gave us nearly 600 pictures. I then copied these into the Video Editor app and added a title frame and soundtrack. After several celebrated viewings, we decided to trim the nighttime frames as it was quite boring staring at several seconds of black screen, even if the soundtrack was quite catchy. My son was very pleased with the final result, and we hope you enjoy it too!
by Steve Lewis @Steve_Lewis81
How can we help?
If you are looking for a Contract Electronics Manufacturing partner, submit your enquiry today and a member of our team will be in touch shortly.
Are you experiencing an issue with your Sony product? Tell us about it and our team of expert technicians will be in touch.
Are you looking for office space with fantastic amenities and 24/7 security? Enquire today with your requirements and our team will be in touch with information about our availability.
We are a socially aware business which seeks to support our local community You can submit your request today using the form on the right. Please note that we can only support requests within a 30 mile radius from our facility. Our committee reviews requests on a monthly basis, so please allow a few weeks for our team to respond.
To arrange a visit for your school as a part of our educational programs, please submit your inquiry today. Our committed team will respond with guidance regarding availability within a week.